I'm in Edinburgh and have the whole thing working on my laptop - if you want to pop over at some point I'm sure we can get it working on your linux/x86 machine. We could also make it work on the MacOS X machine _IF_ either libftdi or FTDICHIP.COM ftdi2xx library is available for that target.
Anyway, here's what I use:
Code: Select all
robin@polywag ~/stm32 $ openocd --version
Open On-Chip Debugger 1.0 (2008-11-09-14:16) svn:exported
Code: Select all
robin@polywag ~/stm32 $ cat openocd.cfg
interface ft2232
ft2232_device_desc "Olimex OpenOCD JTAG"
ft2232_layout "olimex-jtag"
ft2232_vid_pid 0x15BA 0x0003
jtag_khz 500
jtag_nsrst_delay 200
jtag_ntrst_delay 200
reset_config trst_and_srst combined
jtag_device 4 0x1 0xf 0xe
jtag_device 5 0x1 0x1 0x1e
target create target0 cortex_m3 -endian little -chain-position 0
[new_target_name] configure -work-area-virt 0 -work-area-phys 0x20000000 -work-area-size 16384 -work-area-backup 0
flash bank stm32x 0x08000000 0x0020000 0 0 0
init
soft_reset_halt
IIRC I had to solder a link on the board to connect RST and TRST together so that the JTAG reset would hard reset both the system and the JTAG port.
I use a gentoo linux system so just emerged the openocd ebuild. But looking at this ebuild, all it does is pull down the current trunk from svn repository at
http://svn.berlios.de/svnroot/repos/openocd/trunk. The last tag appears to be the 0.1.0 version that you're using, which is hugely out of date w.r.t. the trunk, so you really want something from the trunk not the tags repository.
So I suggest you try:
Code: Select all
cd /tmp
svn checkout http://svn.berlios.de/svnroot/repos/openocd/trunk openocd
cd openocd
./configure --enable-ft2232_ftd2xx --enable-usbprog
make
Now you'll end up with a workable binary at /tmp/openocd/src/openocd
You can test that with the config file I used above.
I just did this very same thing, and built this latest variant. I note that they've changed the configuration syntax, but luckily support the old syntax too (see various OLD SYNTAX warnings in the output below)
Code: Select all
robin@polywag ~/stm32/test $ ../../openocd/src/openocd --file ../openocd.cfg
Open On-Chip Debugger 1.0 (2009-03-25-19:37) svn:1433


BUGS? Read http://svn.berlios.de/svnroot/repos/openocd/trunk/BUGS


$URL: http://svn.berlios.de/svnroot/repos/openocd/trunk/src/openocd.c $
500 kHz
OLD SYNTAX: DEPRECATED - translating to new syntax
jtag newtap CHIP TAP -irlen 4 -ircapture 0x1 -irvalue 0xf
Example: STM32 has 2 taps, the cortexM3(len4) + boundaryscan(len5)
jtag newtap stm32 cortexm3 ....., thus creating the tap: "stm32.cortexm3"
jtag newtap stm32 boundary ....., and the tap: "stm32.boundary"
And then refer to the taps by the dotted name.
NEW COMMAND:
OLD SYNTAX: DEPRECATED - translating to new syntax
jtag newtap CHIP TAP -irlen 5 -ircapture 0x1 -irvalue 0x1
Example: STM32 has 2 taps, the cortexM3(len4) + boundaryscan(len5)
jtag newtap stm32 cortexm3 ....., thus creating the tap: "stm32.cortexm3"
jtag newtap stm32 boundary ....., and the tap: "stm32.boundary"
And then refer to the taps by the dotted name.
NEW COMMAND:
Info : JTAG tap: chip0.tap0 tap/device found: 0x3ba00477 (Manufacturer: 0x23b, Part: 0xba00, Version: 0x3)
Info : JTAG tap: chip1.tap1 tap/device found: 0x16410041 (Manufacturer: 0x020, Part: 0x6410, Version: 0x1)
Warn : no telnet port specified, using default port 4444
Warn : no gdb port specified, using default port 3333
Warn : no tcl port specified, using default port 6666
requesting target halt and executing a soft reset
Which then works on my system, as you can see above.
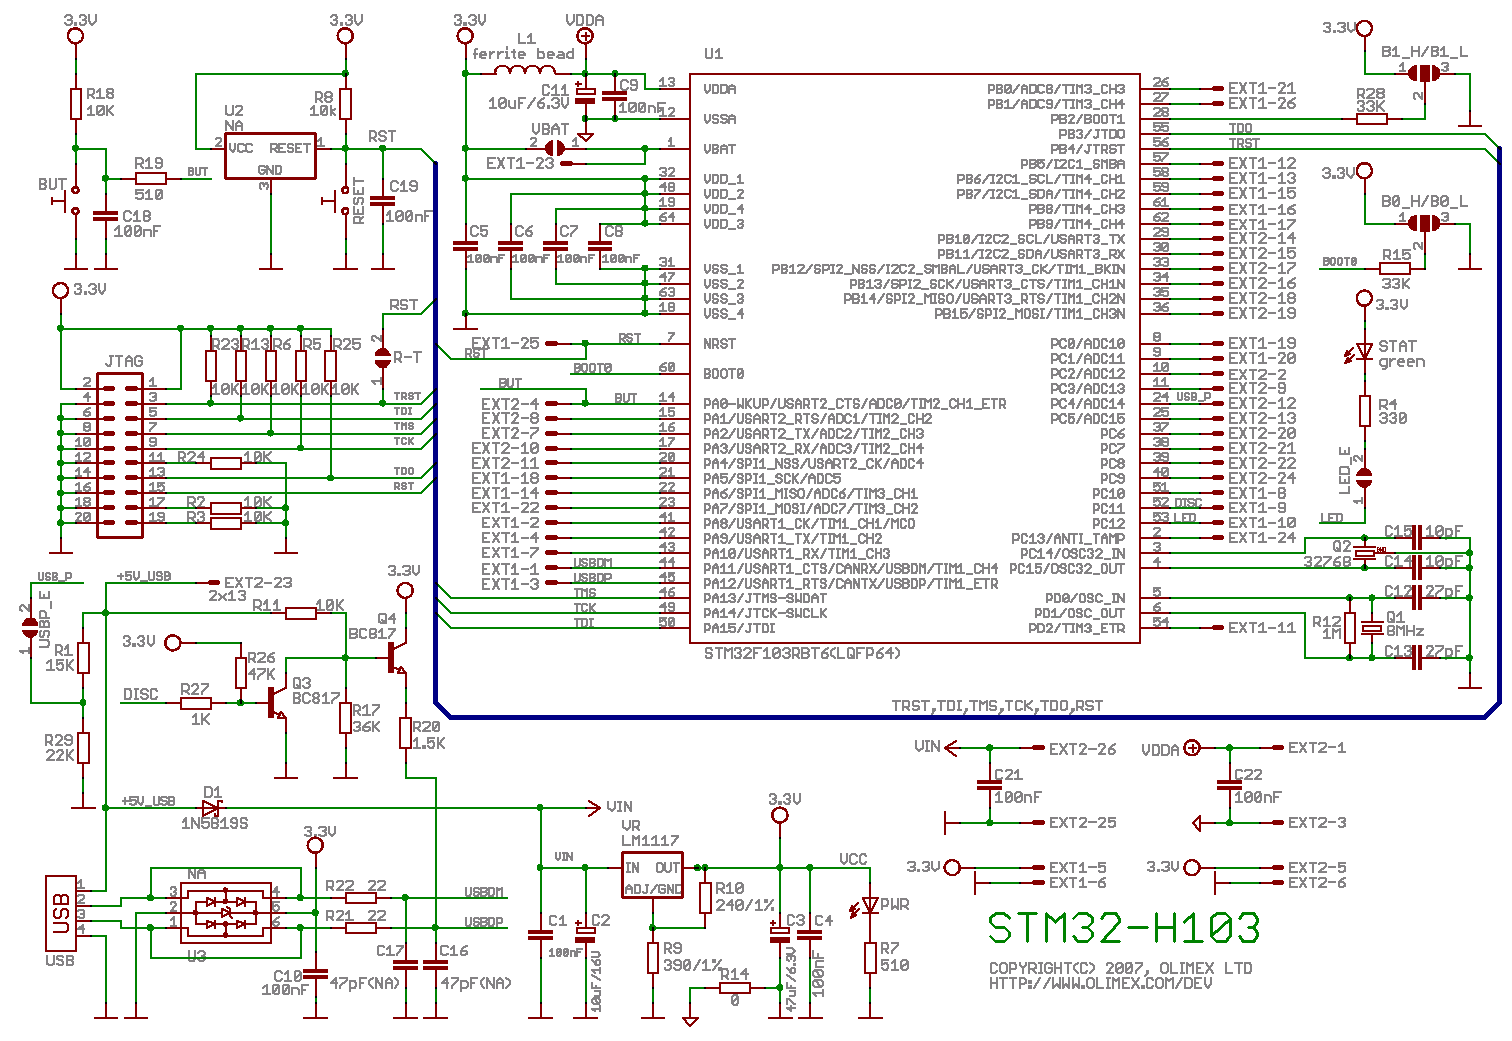
Looking at the schematics for the H103
clicky you can see there's a pair of semi-circles labelled R-T - you need to put a solder blob across these in order to enable the JTAG TRST to also execute a RST. On the actual board they are probably two rectangular pads labelled R-T also.
Now you also need to ensure that the FLASH programming algorithms that are built into a boot loader ROM in the STM32 are mapped in to memory while the JTAG is trying to do FLASH programming. To make this work you need to identify the B1_H/B1L and B0_H/B0_L pad triplets - on the schematic these are two semi-circles with a rectangle in the middle; on the board they are three rectangular pads with gaps in between them. Solder blob the centre pad on each to the B0_L and B1_L respectively. Now solder a wire from the CPU facing side (left side on the schematic) of R15 to a push button switch that in turn connects to 3v3 when pushed. The intent is that when you press the button, R15 is pulled up and thus the BOOT0 input on the CPU goes high. If you hold this button whilst executing the openocd reset command, the processor will boot in FLASH programming mode. As far as I can tell this isn't documented anywhere!!!!
My sequence for updating the FLASH is:
Code: Select all
robin@polywag cd ~/stm32/test (this is where my main.bin lives)
openocd --file ../openocd.cfg (my openocd.cfg is in ~/stm32)
Note that openocd runs in the foreground, so the above won't return to the command prompt until you exit openocd.
Then in another terminal:
Code: Select all
robin@polywag ~ $ telnet localhost 4444
Trying 127.0.0.1...
Connected to localhost.
Escape character is '^]'.
Open On-Chip Debugger
NOTE: before executing this next command, press and hold the BOOT0 button ...
Code: Select all
> reset
JTAG tap: chip0.tap0 tap/device found: 0x3ba00477 (Manufacturer: 0x23b, Part: 0xba00, Version: 0x3)
JTAG tap: chip1.tap1 tap/device found: 0x16410041 (Manufacturer: 0x020, Part: 0x6410, Version: 0x1)
NOTE: now you can release the BOOT0 button ....
Code: Select all
> halt
target state: halted
target halted due to debug-request, current mode: Thread
xPSR: 0xa1000000 pc: 0x1ffff3b8

> stm32x unlock 0
stm32x unlocked

>     flash erase_address 0x08000000 0x20000
erased address 0x08000000 length 131072 in 0.079967s

>     flash write_bank 0 main.bin 0
wrote  20636 byte from file main.bin to flash bank 0 at offset 0x00000000 in 4.719957s (4.269603 kb/s)

> reset
JTAG tap: chip0.tap0 tap/device found: 0x3ba00477 (Manufacturer: 0x23b, Part: 0xba00, Version: 0x3)
JTAG tap: chip1.tap1 tap/device found: 0x16410041 (Manufacturer: 0x020, Part: 0x6410, Version: 0x1)

>
Now that's a bit tedious to type in each time, so I cheat and put it all on one line, thus:
Code: Select all
> reset; halt; stm32x unlock 0; flash erase_address 0x08000000 0x20000; flash write_bank 0 main.bin 0; reset
And note that the monitor shell has command line history, so once it's in there you can keep pressing the up arrow to get the command back.
Now once you execute the reset command, your code will start running. If you want to debug with GDB, you can do this:
Code: Select all
robin@polywag ~ $ cd ~/stm32/test
robin@polywag ~/stm32/test $ arm-none-eabi-gdb main.out
(gdb) target remote localhost:3333
(gdb) monitor soft_reset_halt
(gdb) where
(gdb) break main
(gdb) continue
Cheers,
Robin
